Pytorch Ligntning 轻量级框架浅析
该文章为基于官方文档的学习总结
使用该框架的优点(why not using it?)
- 保持了全部的灵活性
- 更可读,将工程代码和研究代码解耦
- 更容易重现(reproduce)
- 更易扩展,且不需要改变模型
使用流程
定义 LightningModule
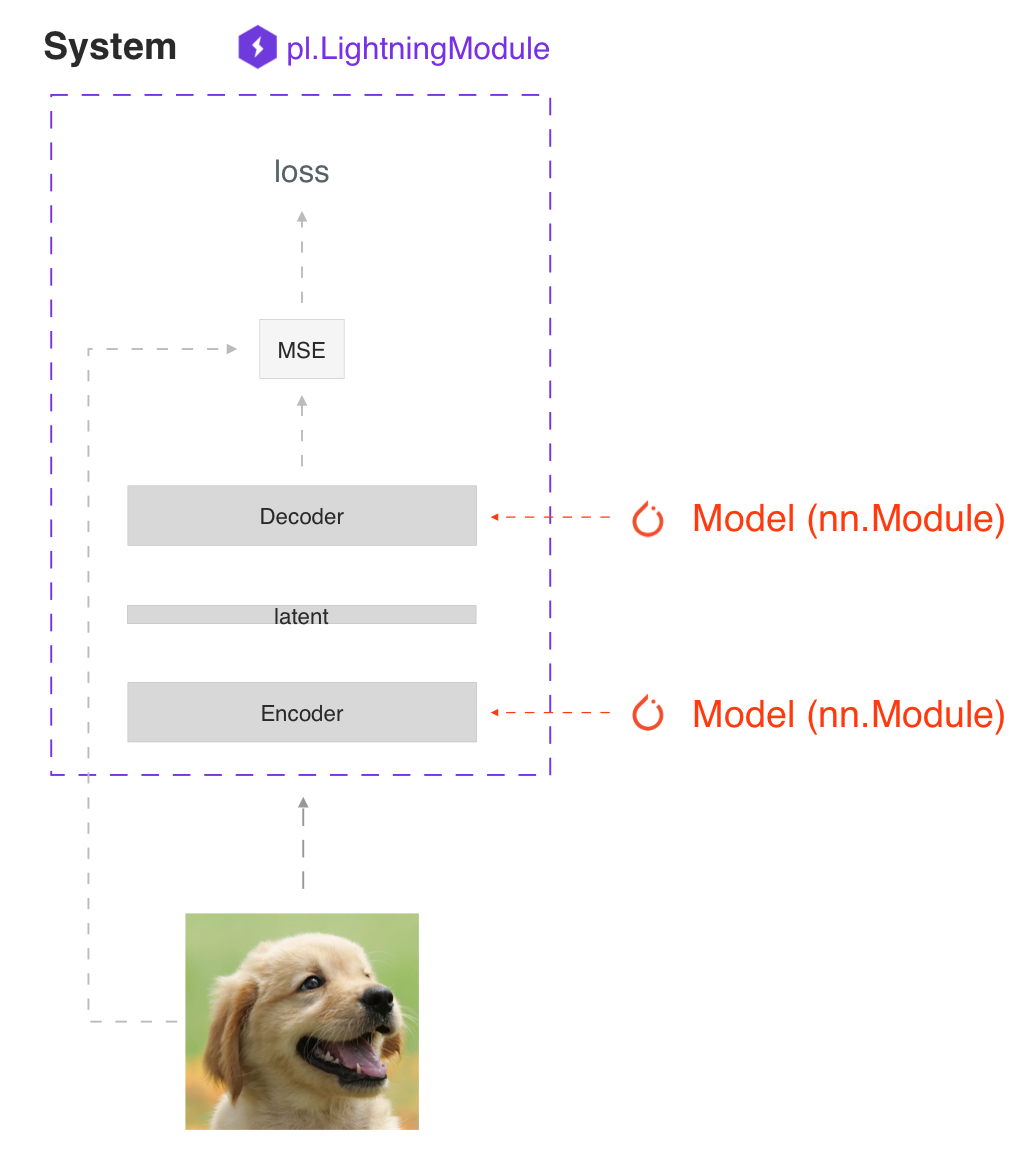
SYSTEM VS MODEL
一个lightning 模块不仅仅只是model,更是一个系统

实际上lightning模块仅仅是一个torch.nn.Module模块,该模块将所有的研究代码集中到了一个文件当中,使它包含了:
- The Train loop
- The Validation loop
- The Test loop
- The Prediction loop
- The Model or system of Models
- The Optimizers and LR Schedulers
通过Hooks特性,我们自定义训练的任何细节,详见:Hooks
FORWARD vs TRAINING_STEP
lighting推荐将训练和推理相分离
- 使用
forward进行推理或预测 - 使用
training_step进行训练
使用Lightning Trainer来拟合数据
首先需要定义数据集:
1
data_module = UCF101DataLoader()
初始化lightning模块和trainer,之后调用fit进行训练:
1
2
3
4
classification_module = VideoClassificationLightningModule()
trainer = pytorch_lightning.Trainer(gpus=[0, 1], strategy="ddp", max_epochs=30,default_root_dir="logs_ucf101", precision=16)
trainer.fit(classification_module, data_module)trainer支持多种训练功能的自动化
- Epoch and batch iteration
optimizer.step(),loss.backward(),optimizer.zero_grad()calls- Calling of
model.eval(), enabling/disabling grads during evaluation - Checkpoint Saving and Loading
- Tensorboard (see loggers options)
- Multi-GPU support
- TPU
- 16-bit precision AMP support
基本特色
自动化优化
只要在train_step()返回loss损失,lighting就会自动地帮我们反向传播,更新优化器等;对于GAN,强化学习这类涉及多个优化器的模型,我们也可以关闭自动优化自己控制:
1 | def __init__(self): |
预测和部署
进行预测的三种方式
提取子模型:
1
2
3
4
5
6
7
8
9
10
11
12
# ----------------------------------
# to use as embedding extractor
# ----------------------------------
autoencoder = LitAutoEncoder.load_from_checkpoint("path/to/checkpoint_file.ckpt")
encoder_model = autoencoder.encoder
encoder_model.eval()
# ----------------------------------
# to use as image generator
# ----------------------------------
decoder_model = autoencoder.decoder
decoder_model.eval()使用forward函数:
1
2
3
4
5
6
7
8
9
10
11
12
13
14
15
# ----------------------------------
# using the AE to extract embeddings
# ----------------------------------
class LitAutoEncoder(LightningModule):
def __init__(self):
super().__init__()
self.encoder = nn.Sequential(nn.Linear(28 * 28, 64))
def forward(self, x):
embedding = self.encoder(x)
return embedding
autoencoder = LitAutoEncoder()
embedding = autoencoder(torch.rand(1, 28 * 28))生产(production):
- Onnx using
to_onnx()method
1
2
3
autoencoder = LitAutoEncoder()
input_sample = torch.randn((1, 28 * 28))
autoencoder.to_onnx(file_path="model.onnx", input_sample=input_sample, export_params=True)- TorchScript using
to_torchscript()method.
1
2
autoencoder = LitAutoEncoder()
autoencoder.to_torchscript(file_path="model.pt")- Onnx using
多种加速方式(accelerators)
CPU
1
2
3
4
5
6
# train on CPU / 什么都不设置,默认在cpu上
trainer = Trainer()
# train on 8 CPUs
trainer = Trainer(accelerator="cpu", devices=8)
# train on 128 machines,8 devices per machine
trainer = pl.Trainer(accelerator="cpu", devices=8, num_nodes=128)GPU
1
2
3
4
5
6
7
8
9
10
11
# train on 1 GPU
trainer = pl.Trainer(accelerator="gpu", devices=1)
# train on multiple GPUs across nodes (32 GPUs here)
trainer = pl.Trainer(accelerator="gpu", devices=4, num_nodes=8)
# train on gpu 1, 3, 5 (3 GPUs total)
trainer = pl.Trainer(accelerator="gpu", devices=[1, 3, 5])
# Multi GPU with mixed precision
trainer = pl.Trainer(accelerator="gpu", devices=2, precision=16)TPU
IPU
模型checkpoint
保存训练超参
1 | class MyLightningModule(LightningModule): |
使用self.save_hyperparameters()会自动保存传入init的超参数到checkpoint,可以从字典里的”hyper_parameters”键中找到超参
恢复训练状态
1 | model = LitModel() |
恢复模型权重
Lightning 会在每个epoch结束时自动保存模型,一旦训练完成就可以按照下面的方法加载checkpoint:
1 | model = LitModel.load_from_checkpoint(path_to_saved_checkpoint) |
下面的是手动加载的方式,与上面的方式等价:
1 | # load the ckpt |
数据流
对于每一个loop(training,validation,test,predict)我们都可以实现3个hooks来自定义数据流向:
- x_step
- x_step_end(optional)
- x_epoch_end(optional)
1 | outs = [] |
在Lightning中与之等价的方式为:
1 | def training_step(self, batch, batch_idx): |
如果使用dp/dpp2分布式模式,意味着每个batch的数据分散到了多个GPU中,有时我们可能需要将其集合起来进行处理,在这种情况下,可以实现training_step_end()方法来将所有devices的output进行处理来得到结果:
1 | def training_step(self, batch, batch_idx): |
整个过程的流程(伪代码)如下,lightning将如下的细节为我们隐藏:
1 | outs = [] |
额外扩展
调试
lightning提供很多可以用来调试的工具
限制batches数量
1
2
3
4# use only 10 train batches and three val batches per epoch
trainer = Trainer(limit_train_batches=10, limit_val_batches=3)
# use 20% of total train batches and 10% of total val batches per epoch
trainer = Trainer(limit_train_batches=0.2, limit_val_batches=0.1)每个epoch随机选择较少数量的的batch来进行训练
过拟合batches
1
2
3
4
5# Automatically overfit the same batches to your model for a sanity test
# use only 10 train batches
trainer = Trainer(overfit_batches=10)
# use only 20% of total train batches
trainer = Trainer(overfit_batches=0.2)每个epoch固定选择较少数量的的batch来进行训练
快速开发运行
1
2
3
4
5
6
# unit test all the code - hits every line of your code once to see if you have bugs,
# instead of waiting hours to crash somewhere
trainer = Trainer(fast_dev_run=True)
# unit test all the code - hits every line of your code with four batches
trainer = Trainer(fast_dev_run=4)对所有代码进行单元测试,看是否存在bug
验证检查间隔
1
2
# run validation every 25% of a training epoch
trainer = Trainer(val_check_interval=0.25)每1/4个epoch进行一次validation
性能测试
1
2
# Profile your code to find speed/memory bottlenecks
Trainer(profiler="simple")
其他有用的特性
- Automatic early stopping
- Automatic truncated-back-propagation-through-time
- Automatically scale your batch size
- Automatically find learning rate
- Load checkpoints directly from S3
- Scale to massive compute clusters
- Use multiple dataloaders per train/val/test/predict loop
- Use multiple optimizers to do reinforcement learning or even GANs
- Post title:Pytorch Ligntning 轻量级框架浅析
- Post author:sixwalter
- Create time:2023-08-05 11:14:26
- Post link:https://coelien.github.io/2023/08/05/projects/kinetics project/Lightning/
- Copyright Notice:All articles in this blog are licensed under BY-NC-SA unless stating additionally.